

Contribute to Nebari's documentation
A complete and accessible set of documentation is essential for an open source project's success. Thank you for making Nebari's documentation better!
Nebari has the following (broad) types of documentation:
- Narrative documentation in the form of tutorials, how-to's, and more, hosted on
nebari.dev(this website). Keep reading this page to learn how you can contribute! - Docstrings and READMEs that are a part of the nebari codebase and other GitHub repositories in the nebari-dev, respectively. To contribute to these, check out Contribute to Nebari's codebase.
- Demos and examples for community self-study and conference presentations hosted at nebari/nebari-demo. To contribute examples, start at the Nebari Demo README.
Documentation style guide
Section titled “Documentation style guide”We follow some style guidelines across the Nebari documentation resources to maintain consistency and keep our documentation accessible to everyone. Take a few minutes to go through the key principles before contributing. We encourage you to read the complete style guide when you get a chance. Many suggestions in the style guide are good practices to follow in day-to-day written communication as well.
Read the Nebari documentation style guide →
Documentation tools
Section titled “Documentation tools”Nebari's documentation is built with Docusaurus 2, a modern static website generator. With Docusaurs, you can author documentation using a friendly Markdown format, which are converted to consistent documentation page. If you are not familiar with Markdown, check out the Markdown Guide project for a comprehensive reference.
In addition to general Markdown, Docusaurs has some helpful special features like tabs and admonitions, go through the Markdown Features section of the Docusaurus documentation to learn about them!
We use Netlify for deploying the documentation. The deployment to nebari.dev is automatically handled by Netlify when your content is merged into the nebari-docs/main branch.
Netlify will also add a nifty preview link to any PR as a comment. This way you can make sure everything is working as expected.
Documentation framework
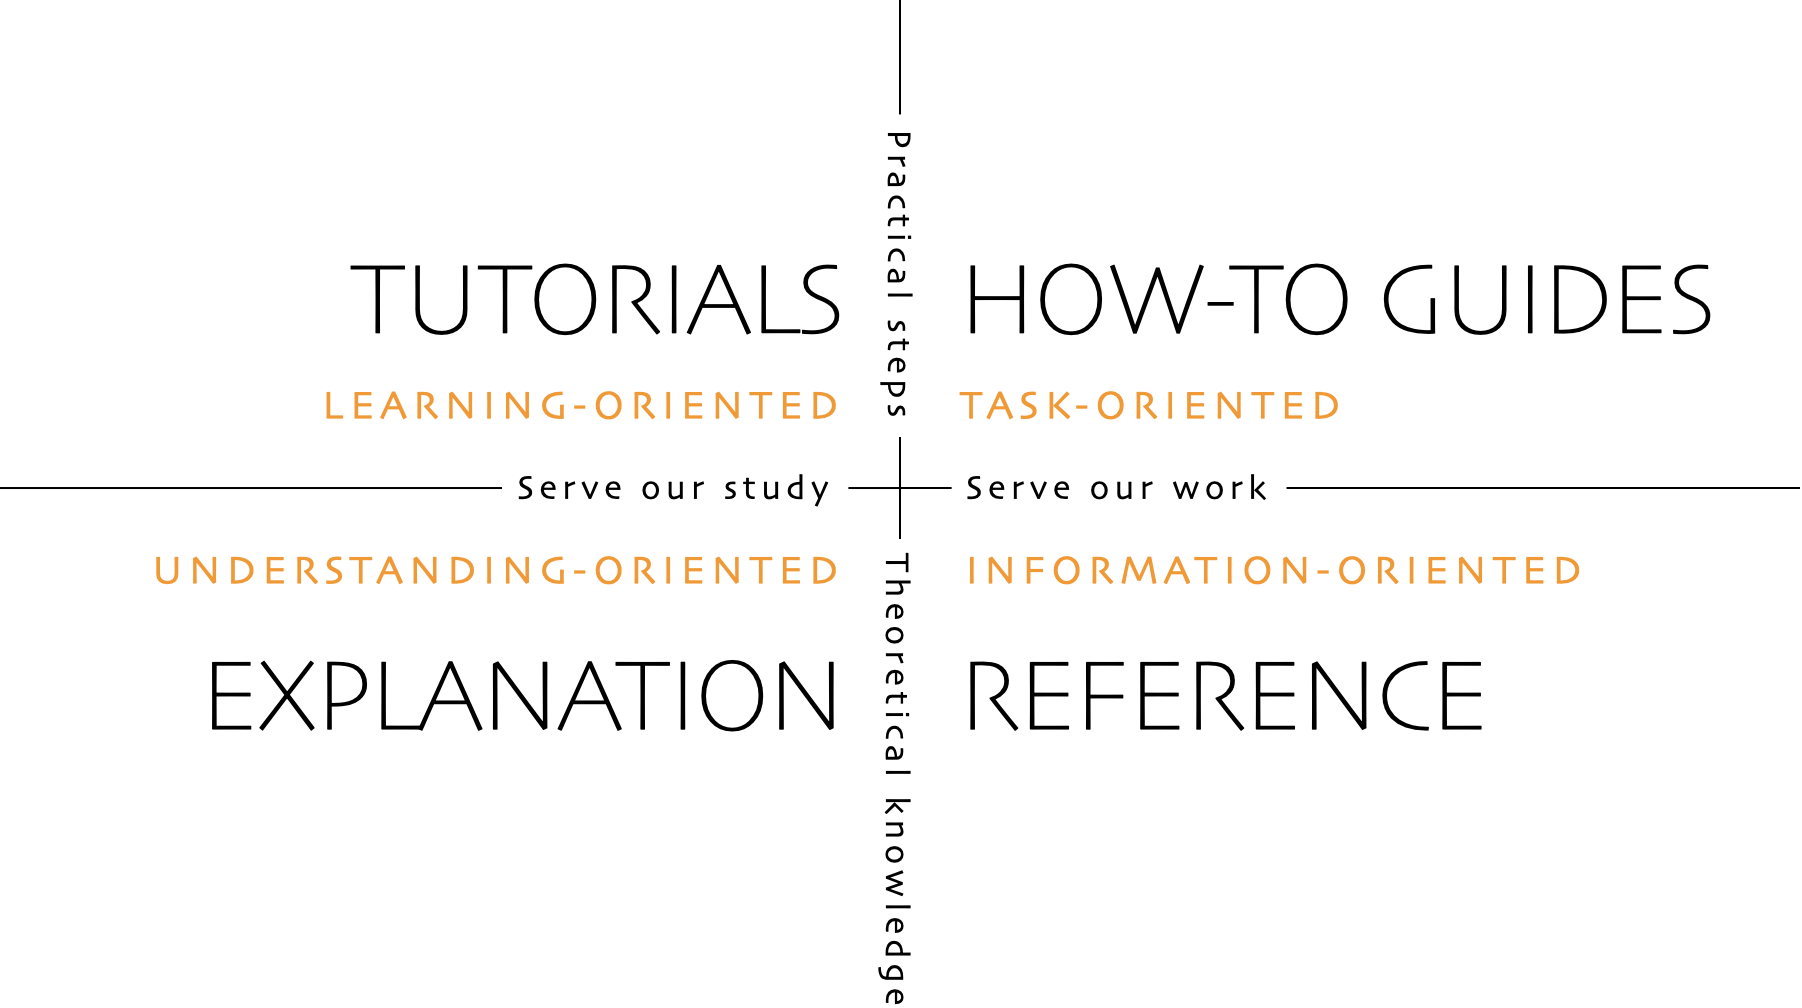
Section titled “Documentation framework”Nebari uses the Diátaxis framework for technical documentation. The Diátaxis framework recognizes four types of documentation: Tutorials, how-to guides, explanations (called "conceptual guides" in Nebari), and references. As described in the following diagram, each of these types of documentation serve a different purpose, and therefore, are written differently:
Set up your local repository
Section titled “Set up your local repository”-
Make a fork of the
Nebari-docsrepository to your GitHub account. -
Clone the forked repository to your local machine:
Terminal window git clone https://github.com/<your-username>/nebari-docs.git
Set up your local development environment
Section titled “Set up your local development environment”Optional: Create an isolated environment
Section titled “Optional: Create an isolated environment”-
To create an environment with
conda:Terminal window conda create -n nebari-docs python=3.9 -
Activate the environment:
Terminal window conda activate nebari-docs
Prerequisites: Node.js
Section titled “Prerequisites: Node.js”To build the site you will need to have Node.js installed. To see if you already have Node.js installed, type the following command into your local command line terminal:
node -v# v18.10.0If you see a version number, such as v18.10.0 printed, you have Node.js installed, you can move to the next section!
If you get a command not found error (or similar phrasing), install Node.js before continuing.
To install node visit nodejs.org or check any of these tutorials for Ubuntu, Debian, or macOS.
If you created an environment with conda, you can install Node.js with:
conda install -c conda-forge nodejsPrerequisites: Yarn
Section titled “Prerequisites: Yarn”Once you have Node.js installed you can proceed to install Yarn. Yarn has a unique way of installing and running itself in your JavaScript projects. First, you install the yarn command globally, then you use the global yarn command to install a specific local version of Yarn into your project directory.
The Yarn maintainers recommend installing Yarn globally by using the NPM package manager,
which is included by default with all Node.js installations.
Use the -g flag with npm install to do this:
npm install -g yarnAfter the package installs, have the yarn command print its own version number to verify if it was installed properly:
yarn --version# 1.22.11Install documentation dependencies
Section titled “Install documentation dependencies”-
Move to the
/docsdirectory:Terminal window cd docs -
Install the necessary dependencies:
Terminal window yarn install
Pre-commit hooks
Section titled “Pre-commit hooks”Similar to the Nebari codebase, the nebari-docs repository uses a number of pre-commit hooks to standardize our YAML and Markdown structure.
-
Navigate to the root of this project. If you're in the
docssubdirectory, you can run "cd .." to go back to the root. -
Follow the instructions in the Pre-commit hooks section of Contribute to Nebari's codebase to install the pre-commit hooks.
Develop and submit your contribution
Section titled “Develop and submit your contribution”Once you have the dependencies and the pre-commit hooks installed, you can start writing and updating the documentation.
The workflow to develop your contribution is similar to contributing code. The difference is that you're writing or updating Markdown files. Go through the following sections to learn about creating branches, making pull requests, and how the contribution review process works:
Start a live version of the documentation
Section titled “Start a live version of the documentation”To see a live local version of the docs while editing, run the following command from the docs subdirectory:
yarn startThis command starts a local development server and opens up a browser window. Most changes are reflected live without having to restart the server.
(Optional) Build the site locally
Section titled “(Optional) Build the site locally”You can build the static files of the documentation to see how they would look once deployed to nebari.dev:
yarn buildThis command generates static content into the docs/build directory and can be served using any static contents hosting service.
You can check the newly built site with the following command:
yarn run serveLinting and formatting
Section titled “Linting and formatting”In addition to the pre-commit hooks, you can run the Docusaurus linter (ESLint) and formatter (Prettier) to ensure code consistency before submitting a PR.
-
Navigate to the
docsdirectory. -
Run the following commands:
Terminal window yarn run lintyarn run format
Adding a new dependency
Section titled “Adding a new dependency”If you need to a new dependency to the project, use the add sub-command:
yarn add package-name