

Deploy Nebari on AWS
Introduction
Section titled “Introduction”This guide is to help first-time users set up an Amazon Web Services (AWS) account specifically for the purpose of using and deploying Nebari at a production scale. In this guide we will walk you through the following steps:
- Introduction
- Sign up for Amazon Web Services
- Authentication
- Initializing Nebari
- Deploying Nebari
- Destroying Nebari
If you are already familiar to AWS services, feel free to skip this first step and jump straight to the Nebari authentication section of this guide.
Sign up for Amazon Web Services
Section titled “Sign up for Amazon Web Services”This documentation assumes that you are already familiar with AWS Identity and Access Management (IAM) and that you have prior knowledge regarding AWS billing and cost usage for Kubernetes related services.
If you are new to AWS, we advise you to first sign up for a free account to get a better understanding of the platform and its features. Please refer to Amazon VPC (Virtual Private Cloud) and Amazon EKS Prerequisites for more information on account types and prerequisites for managing Kubernetes clusters.
For a more detailed cost estimate, please also refer to our Conceptual guides for more information regarding the basic infrastructure provided by Nebari.
Authentication
Section titled “Authentication”In order for Nebari to make requests against the AWS API and create its infrastructure, an authentication method with the appropriate permissions will be required. The best way to do this is using an IAM user with all the necessary permissions.
Below are two sets of minimal IAM permissions required to deploy and destroy Nebari. You may either create separate IAM policies for each action or combine them into a single policy that includes all permissions.
AWS IAM Policies to deploy and destroy Nebari
{ "Version": "2012-10-17", "Statement": [ { "Effect": "Allow", "Action": [ "ec2:CreateTags", "ec2:DescribeAvailabilityZones", "ec2:DescribeInstanceTypes", "ec2:DescribeInternetGateways", "ec2:DescribeNetworkAcls", "ec2:DescribeRegions", "ec2:DescribeRouteTables", "ec2:DescribeSecurityGroups", "ec2:DescribeSubnets", "ec2:DescribeVpcs", "eks:CreateCluster", "eks:DescribeAddonVersions", "elasticfilesystem:CreateFileSystem", "iam:GetOpenIDConnectProvider", "iam:GetPolicy", "iam:GetPolicyVersion", "iam:TagOpenIDConnectProvider", "kms:CreateKey", "kms:DescribeKey", "kms:ListKeys", "resource-groups:CreateGroup", "sts:GetCallerIdentity" ], "Resource": "*" }, { "Effect": "Allow", "Action": [ "s3:CreateBucket", "s3:GetAccelerateConfiguration", "s3:GetBucketAcl", "s3:GetBucketCORS", "s3:GetBucketLogging", "s3:GetBucketObjectLockConfiguration", "s3:GetBucketPolicy", "s3:GetBucketPublicAccessBlock", "s3:GetBucketRequestPayment", "s3:GetBucketTagging", "s3:GetBucketVersioning", "s3:GetBucketWebsite", "s3:GetEncryptionConfiguration", "s3:GetLifecycleConfiguration", "s3:GetReplicationConfiguration", "s3:ListBucket", "s3:PutBucketPublicAccessBlock", "s3:PutBucketTagging", "s3:PutBucketVersioning", "s3:PutEncryptionConfiguration" ], "Resource": "arn:aws:s3:::PROJECT_NAME-NAMESPACE-terraform-state" }, { "Effect": "Allow", "Action": [ "dynamodb:CreateTable", "dynamodb:DeleteItem", "dynamodb:DescribeContinuousBackups", "dynamodb:DescribeTable", "dynamodb:DescribeTimeToLive", "dynamodb:GetItem", "dynamodb:ListTagsOfResource", "dynamodb:PutItem", "dynamodb:TagResource" ], "Resource": "arn:aws:dynamodb:REGION:ACCOUNT_ID:table/PROJECT_NAME-NAMESPACE-terraform-state-lock" }, { "Effect": "Allow", "Action": [ "kms:EnableKeyRotation", "kms:GetKeyPolicy", "kms:GetKeyRotationStatus", "kms:ListResourceTags" ], "Resource": "arn:aws:kms:REGION:ACCOUNT_ID:key/*" }, { "Effect": "Allow", "Action": [ "ecr:CreateRepository", "ecr:DescribeRepositories", "ecr:ListTagsForResource", "ecr:TagResource" ], "Resource": "arn:aws:ecr:REGION:ACCOUNT_ID:repository/PROJECT_NAME-NAMESPACE-jupyterlab" }, { "Effect": "Allow", "Action": [ "ec2:CreateVpc", "ec2:DescribeVpcAttribute", "ec2:ModifyVpcAttribute" ], "Resource": "arn:aws:ec2:REGION:ACCOUNT_ID:vpc/*" }, { "Effect": "Allow", "Action": [ "iam:AttachRolePolicy", "iam:CreateRole", "iam:GetRole", "iam:ListAttachedRolePolicies", "iam:ListRolePolicies", "iam:TagRole" ], "Resource": "arn:aws:iam::ACCOUNT_ID:role/*" }, { "Effect": "Allow", "Action": [ "iam:CreatePolicy" ], "Resource": "arn:aws:iam::ACCOUNT_ID:policy/*" }, { "Effect": "Allow", "Action": [ "resource-groups:GetGroup", "resource-groups:GetGroupConfiguration", "resource-groups:GetGroupQuery", "resource-groups:GetTags", "resource-groups:Tag" ], "Resource": "arn:aws:resource-groups:REGION:ACCOUNT_ID:group/PROJECT_NAME" }, { "Effect": "Allow", "Action": [ "elasticfilesystem:CreateMountTarget", "elasticfilesystem:DescribeFileSystems", "elasticfilesystem:DescribeLifecycleConfiguration", "elasticfilesystem:TagResource" ], "Resource": "arn:aws:elasticfilesystem:REGION:ACCOUNT_ID:file-system/*" }, { "Effect": "Allow", "Action": [ "ec2:CreateSubnet" ], "Resource": [ "arn:aws:ec2:REGION:ACCOUNT_ID:subnet/*", "arn:aws:ec2:REGION:ACCOUNT_ID:vpc/*" ] }, { "Effect": "Allow", "Action": [ "ec2:CreateInternetGateway" ], "Resource": "arn:aws:ec2:REGION:ACCOUNT_ID:internet-gateway/*" }, { "Effect": "Allow", "Action": [ "ec2:AuthorizeSecurityGroupEgress", "ec2:AuthorizeSecurityGroupIngress", "ec2:CreateSecurityGroup", "ec2:RevokeSecurityGroupEgress" ], "Resource": [ "arn:aws:ec2:REGION:ACCOUNT_ID:security-group/*", "arn:aws:ec2:REGION:ACCOUNT_ID:vpc/*" ] }, { "Effect": "Allow", "Action": [ "ec2:AttachInternetGateway" ], "Resource": [ "arn:aws:ec2:REGION:ACCOUNT_ID:internet-gateway/*", "arn:aws:ec2:REGION:ACCOUNT_ID:vpc/*" ] }, { "Effect": "Allow", "Action": [ "ec2:AssociateRouteTable", "ec2:ModifySubnetAttribute" ], "Resource": "arn:aws:ec2:REGION:ACCOUNT_ID:subnet/*" }, { "Effect": "Allow", "Action": [ "ec2:CreateRouteTable" ], "Resource": [ "arn:aws:ec2:REGION:ACCOUNT_ID:route-table/*", "arn:aws:ec2:REGION:ACCOUNT_ID:vpc/*" ] }, { "Effect": "Allow", "Action": [ "ec2:AssociateRouteTable", "ec2:CreateRoute" ], "Resource": "arn:aws:ec2:REGION:ACCOUNT_ID:route-table/*" }, { "Effect": "Allow", "Action": [ "iam:PassRole" ], "Resource": "arn:aws:iam::ACCOUNT_ID:role/PROJECT_NAME-NAMESPACE-eks-cluster-role" }, { "Effect": "Allow", "Action": [ "elasticfilesystem:DescribeMountTargetSecurityGroups", "elasticfilesystem:DescribeMountTargets" ], "Resource": "arn:aws:elasticfilesystem:REGION:ACCOUNT_ID:file-system/*" }, { "Effect": "Allow", "Action": [ "eks:CreateAddon", "eks:CreateNodegroup", "eks:DescribeCluster", "eks:ListNodegroups", "eks:TagResource" ], "Resource": "arn:aws:eks:REGION:ACCOUNT_ID:cluster/PROJECT_NAME-NAMESPACE" }, { "Effect": "Allow", "Action": [ "iam:PassRole" ], "Resource": "arn:aws:iam::ACCOUNT_ID:role/PROJECT_NAME-NAMESPACE-eks-node-group-role" }, { "Effect": "Allow", "Action": [ "eks:DescribeNodegroup" ], "Resource": "arn:aws:eks:REGION:ACCOUNT_ID:nodegroup/PROJECT_NAME-NAMESPACE/*" }, { "Effect": "Allow", "Action": [ "eks:DescribeAddon" ], "Resource": "arn:aws:eks:REGION:ACCOUNT_ID:addon/PROJECT_NAME-NAMESPACE/*" }, { "Effect": "Allow", "Action": [ "iam:CreateOpenIDConnectProvider" ], "Resource": "arn:aws:iam::ACCOUNT_ID:oidc-provider/*" }, { "Effect": "Allow", "Action": [ "autoscaling:CreateOrUpdateTags" ], "Resource": "arn:aws:autoscaling:REGION:ACCOUNT_ID:autoScalingGroup:*:autoScalingGroupName/*" }, { "Effect": "Allow", "Action": [ "s3:GetObject", "s3:GetObjectTagging", "s3:GetObjectVersion", "s3:ListMultipartUploadParts", "s3:PutObject", "s3:PutObjectAcl", "s3:PutObjectTagging" ], "Resource": "arn:aws:s3:::PROJECT_NAME-NAMESPACE-terraform-state/*" } ]}{ "Version": "2012-10-17", "Statement": [ { "Effect": "Allow", "Action": [ "ec2:DescribeAvailabilityZones", "ec2:DescribeInstanceTypes", "ec2:DescribeInternetGateways", "ec2:DescribeNetworkAcls", "ec2:DescribeNetworkInterfaces", "ec2:DescribeRegions", "ec2:DescribeRouteTables", "ec2:DescribeSecurityGroups", "ec2:DescribeSubnets", "ec2:DescribeVpcs", "eks:DescribeAddonVersions", "iam:DeleteOpenIDConnectProvider", "iam:DeletePolicy", "iam:GetOpenIDConnectProvider", "iam:GetPolicy", "iam:GetPolicyVersion", "iam:ListPolicyVersions", "kms:ListKeys", "sts:GetCallerIdentity" ], "Resource": "*" }, { "Effect": "Allow", "Action": [ "kms:DescribeKey", "kms:GetKeyPolicy", "kms:GetKeyRotationStatus", "kms:ListResourceTags", "kms:ScheduleKeyDeletion" ], "Resource": "arn:aws:kms:REGION:ACCOUNT_ID:key/*" }, { "Effect": "Allow", "Action": [ "s3:DeleteBucket", "s3:GetAccelerateConfiguration", "s3:GetBucketAcl", "s3:GetBucketCORS", "s3:GetBucketLogging", "s3:GetBucketObjectLockConfiguration", "s3:GetBucketPolicy", "s3:GetBucketPublicAccessBlock", "s3:GetBucketRequestPayment", "s3:GetBucketTagging", "s3:GetBucketVersioning", "s3:GetBucketWebsite", "s3:GetEncryptionConfiguration", "s3:GetLifecycleConfiguration", "s3:GetReplicationConfiguration", "s3:ListBucket", "s3:ListBucketVersions", "s3:PutBucketPublicAccessBlock", "s3:PutEncryptionConfiguration" ], "Resource": "arn:aws:s3:::PROJECT_NAME-NAMESPACE-terraform-state" }, { "Effect": "Allow", "Action": [ "s3:DeleteObject", "s3:DeleteObjectVersion", "s3:GetObject", "s3:GetObjectTagging", "s3:GetObjectVersion", "s3:ListMultipartUploadParts", "s3:PutObject", "s3:PutObjectAcl", "s3:PutObjectTagging" ], "Resource": "arn:aws:s3:::PROJECT_NAME-NAMESPACE-terraform-state/*" }, { "Effect": "Allow", "Action": [ "dynamodb:DeleteItem", "dynamodb:DeleteTable", "dynamodb:DescribeContinuousBackups", "dynamodb:DescribeTable", "dynamodb:DescribeTimeToLive", "dynamodb:GetItem", "dynamodb:ListTagsOfResource", "dynamodb:PutItem" ], "Resource": "arn:aws:dynamodb:REGION:ACCOUNT_ID:table/PROJECT_NAME-NAMESPACE-terraform-state-lock" }, { "Effect": "Allow", "Action": [ "eks:DeleteCluster", "eks:DescribeCluster" ], "Resource": "arn:aws:eks:REGION:ACCOUNT_ID:cluster/PROJECT_NAME-NAMESPACE" }, { "Effect": "Allow", "Action": [ "ecr:DeleteRepository", "ecr:DescribeRepositories", "ecr:ListTagsForResource" ], "Resource": "arn:aws:ecr:REGION:ACCOUNT_ID:repository/PROJECT_NAME-NAMESPACE-jupyterlab" }, { "Effect": "Allow", "Action": [ "iam:DeleteRole", "iam:DetachRolePolicy", "iam:GetRole", "iam:ListAttachedRolePolicies", "iam:ListInstanceProfilesForRole", "iam:ListRolePolicies" ], "Resource": "arn:aws:iam::ACCOUNT_ID:role/*" }, { "Effect": "Allow", "Action": [ "elasticfilesystem:DeleteFileSystem", "elasticfilesystem:DescribeFileSystems", "elasticfilesystem:DescribeLifecycleConfiguration" ], "Resource": "arn:aws:elasticfilesystem:REGION:ACCOUNT_ID:file-system/*" }, { "Effect": "Allow", "Action": [ "resource-groups:DeleteGroup", "resource-groups:GetGroup", "resource-groups:GetGroupConfiguration", "resource-groups:GetGroupQuery", "resource-groups:GetTags" ], "Resource": "arn:aws:resource-groups:REGION:ACCOUNT_ID:group/PROJECT_NAME" }, { "Effect": "Allow", "Action": [ "ec2:DescribeVpcAttribute" ], "Resource": "arn:aws:ec2:REGION:ACCOUNT_ID:vpc/*" }, { "Effect": "Allow", "Action": [ "elasticfilesystem:DeleteMountTarget", "elasticfilesystem:DescribeMountTargetSecurityGroups", "elasticfilesystem:DescribeMountTargets" ], "Resource": "arn:aws:elasticfilesystem:REGION:ACCOUNT_ID:file-system/*" }, { "Effect": "Allow", "Action": [ "eks:DeleteNodegroup", "eks:DescribeNodegroup" ], "Resource": "arn:aws:eks:REGION:ACCOUNT_ID:nodegroup/PROJECT_NAME-NAMESPACE/*" }, { "Effect": "Allow", "Action": [ "eks:DeleteAddon", "eks:DescribeAddon" ], "Resource": "arn:aws:eks:REGION:ACCOUNT_ID:addon/PROJECT_NAME-NAMESPACE/*" }, { "Effect": "Allow", "Action": [ "ec2:DisassociateRouteTable" ], "Resource": [ "arn:aws:ec2:REGION:ACCOUNT_ID:route-table/*", "arn:aws:ec2:REGION:ACCOUNT_ID:subnet/*" ] }, { "Effect": "Allow", "Action": [ "ec2:DeleteRouteTable" ], "Resource": "arn:aws:ec2:REGION:ACCOUNT_ID:route-table/*" }, { "Effect": "Allow", "Action": [ "ec2:DetachInternetGateway" ], "Resource": [ "arn:aws:ec2:REGION:ACCOUNT_ID:internet-gateway/*", "arn:aws:ec2:REGION:ACCOUNT_ID:vpc/*" ] }, { "Effect": "Allow", "Action": [ "ec2:DeleteSubnet" ], "Resource": "arn:aws:ec2:REGION:ACCOUNT_ID:subnet/*" }, { "Effect": "Allow", "Action": [ "ec2:DeleteSecurityGroup" ], "Resource": "arn:aws:ec2:REGION:ACCOUNT_ID:security-group/*" } ]}As a best practice, do not use the AWS account root user for any task where it's not
required. Instead, create a new IAM user for each person that requires administrator access. Then make those users administrators by placing them into an "Administrators" (or any other name) user group, to which you attach the policies outlined above.
If you are using an already existing IAM user, please refer to Managing access keys for IAM users for detailed information on how to manage your IAM user's access keys.
If it's your first time creating a new IAM user, please refer to Creating your first IAM admin user and user group for more information. Otherwise, see Creating an IAM user in your AWS account for more information on how to create an IAM user.
Follow these steps to set up your access keys and user accounts:
-
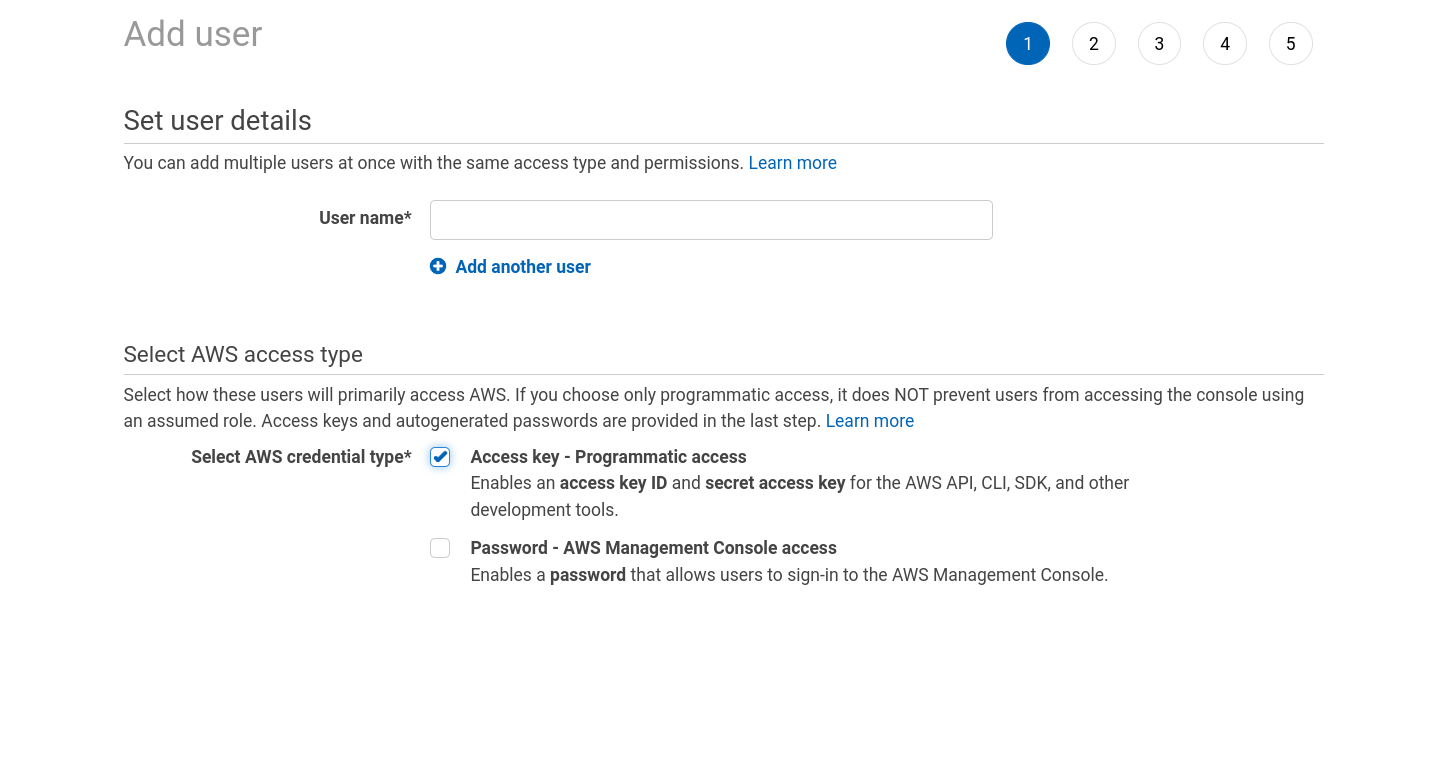
Go to IAM in your AWS Console, then Users, and Add Users;
-
Give the user a name, and tick Access Key - Programmatic access
-
Click Next
-
Select Attach existing policies directly, then select the previously created policies to deploy and destroy Nebari from the list of policies. For more information, please refer to Policies and permissions in IAM;
-
Then proceed with the new user creation setup.
Upon generation, the IAM role will provide a public Access Key ID and Secret Access Key. Download this file for reference later.
By default, Nebari will try to use the credentials associated with the current AWS infrastructure/environment for authentication. Please keep in mind that Nebari will only use these credentials to create the first roles and stricter permissions for Nebari's internal components. Refer to [Conceptual guides] for more information on how Nebari's components are secured.
Provide authentication credentials to Nebari by setting the following environment variables:
export AWS_ACCESS_KEY_ID="Access Key ID"export AWS_SECRET_ACCESS_KEY="Secret Access Key"Initializing Nebari
Section titled “Initializing Nebari”Great, you’ve gone through the Nebari installation and authentication setup steps, and have ensured that all the necessary environment variables have been properly set.
In this step, you'll run nebari init to create the nebari-config.yaml file.
-
In your terminal, start by creating a new project folder. For this demonstration, we will name the new folder
nebari-aws:Terminal window mkdir nebari-aws && cd nebari-aws
-
Executing the
nebari init --guided-initcommand prompts you to respond to a set of questions, which will be used to generate thenebari-config.yamlfile with an infrastructure based on AWS.Terminal window nebari init --guided-init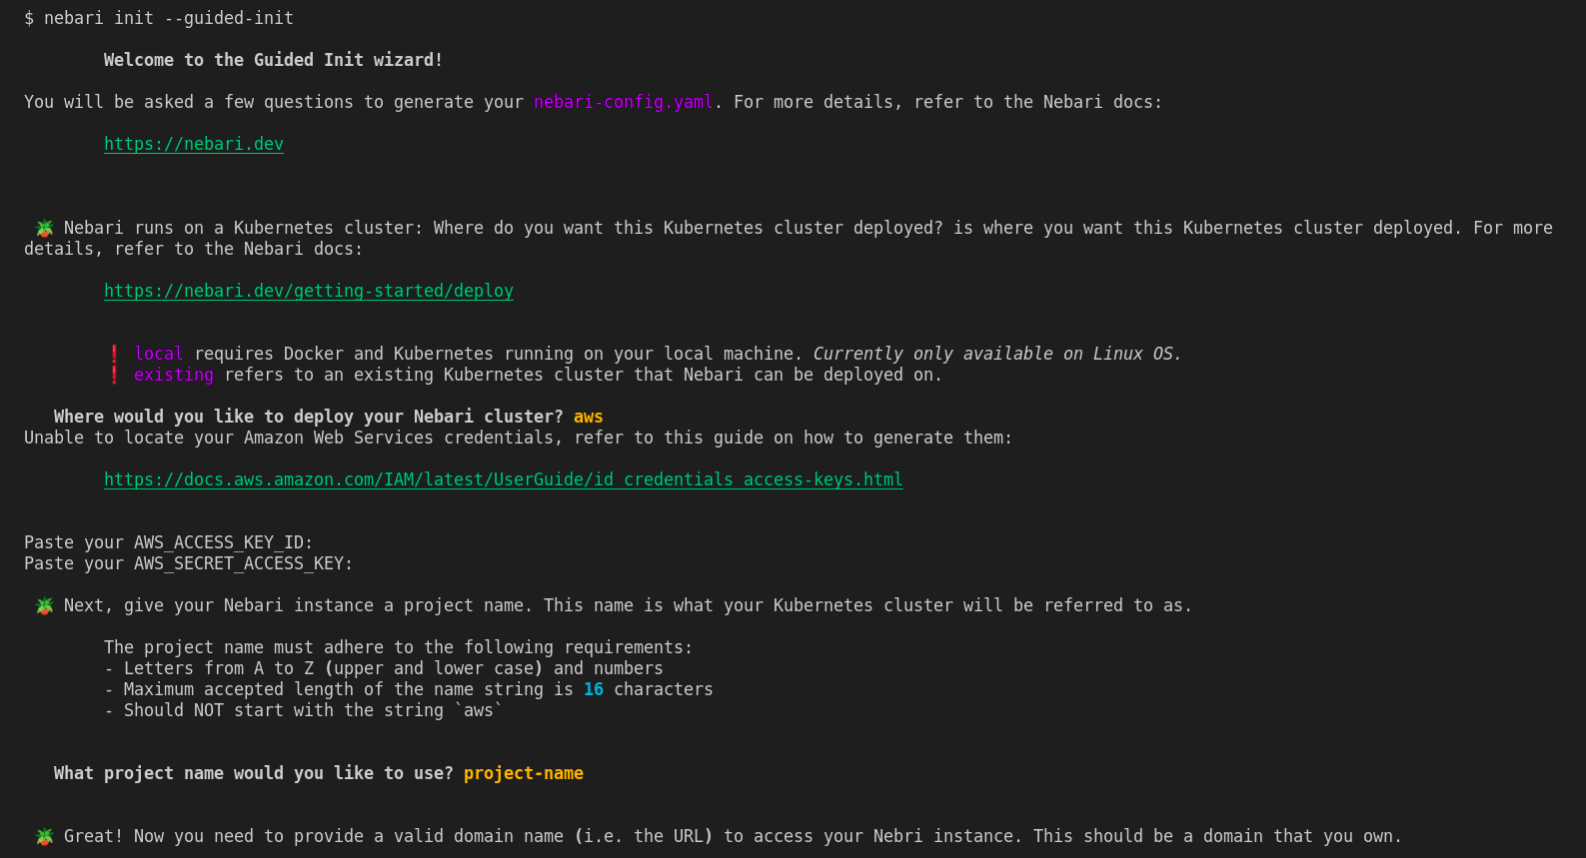
Once nebari init is executed, you should then be able to see the following output:
Securely generated default random password=*** for Keycloak root user stored at path=/tmp/QHUB_DEFAULT_PASSWORDCongratulations, you have generated the all important nebari-config.yaml file 🎉
You can always make changes to your nebari-config.yaml file by editing the file directly.If you do make changes to it you can ensure its still a valid configuration by running:
                nebari validate --config path/to/nebari-config.yaml
For reference, if the previous Guided Init answers were converted into a direct nebari init command, it would be:
               nebari init <cloud-provider> --project-name <project-name> --domain-name <domain-name> --namespace dev --auth-provider password
You can now deploy your Nebari instance with:
        nebari deploy -c nebari-config.yaml
For more information, run nebari deploy --help or check out the documentation: https://www.nebari.dev/how-tos/You can see that Nebari is generating a random password for the root user of Keycloak. This password is stored in a temporary file and will be used to authenticate to the Keycloak server once Nebari's infrastructure is fully deployed, to create the first user accounts for administrator(s).
The Nebari initialization scripts create a nebari-config.yaml file that contains a collection of default preferences and settings for your deployment.
The generated nebari-config.yaml is the configuration file that will determine how the cloud infrastructure and Nebari is built and deployed in the next step. Since it is a
plain text file, you can edit it manually if you are unhappy with the choices you made during initialization, or delete it and start over again by re-running nebari init/nebari init --guided-init.
Deploying Nebari
Section titled “Deploying Nebari”To see all the options available for the deploy command, run the following command:
nebari deploy --help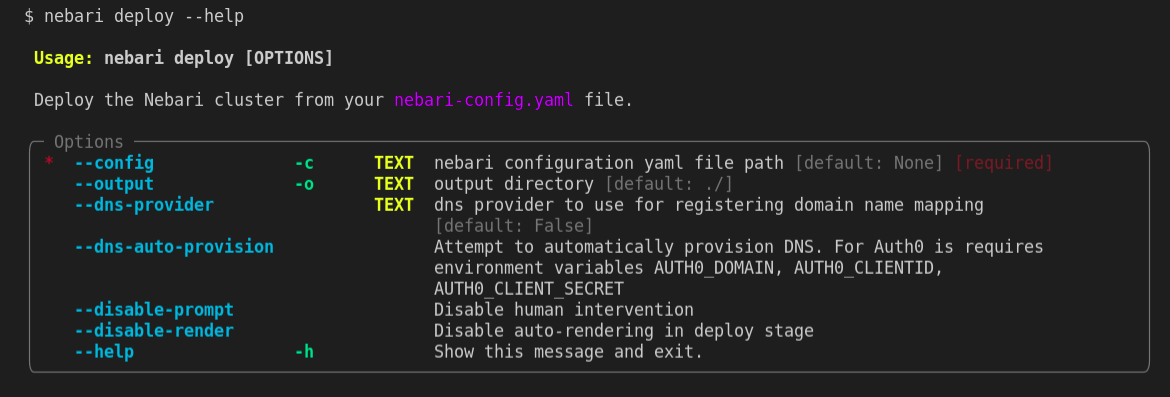
With the nebari-config.yaml configuration file now created, Nebari can be deployed for the first time. Type the following command on your command line:
nebari deploy -c nebari-config.yamlThe terminal will prompt you to press enter to check the authentication credentials that were added as part of the preceding nebari init command. Once Nebari is
authenticated, it will start its infrastructure deployment process, which will take a few minutes to complete.
If the deployment is successful, you will see the following output:
[terraform]: Nebari deployed successfullyServices: - argo-workflows -> https://projectname.domain/argo/ - conda_store -> https://projectname.domain/conda-store/ - dask_gateway -> https://projectname.domain/gateway/ - jupyterhub -> https://projectname.domain/ - keycloak -> https://projectname.domain/auth/ - monitoring -> https://projectname.domain/monitoring/Kubernetes kubeconfig located at file:///tmp/NEBARI_KUBECONFIGKubecloak master realm username=root *****...Congratulations! You have successfully deployed Nebari on AWS! From here, see Initial Nebari Configuration for instructions on the first steps you should take to prepare your Nebari instance for your team's use.
Destroying Nebari
Section titled “Destroying Nebari”To see all the options available for the destroy command, type the following command on your command line:
nebari destroy --help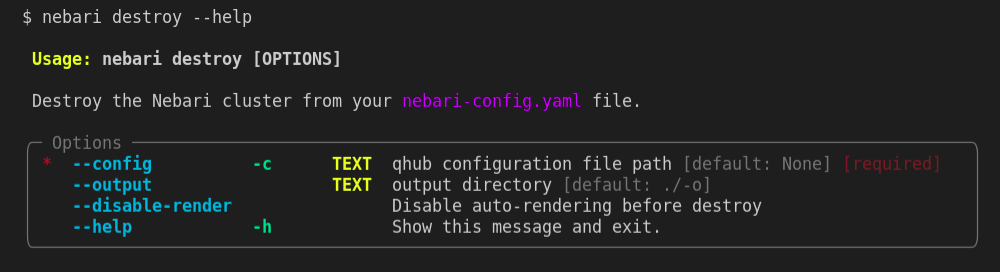
Nebari also has a destroy command that works the same way the deploy works but instead of creating the provisioned resources it destroys it.
nebari destroy -c nebari-config.yaml